a dive under Japanese waters

DIVE ORGANISATION

Diving in Japan: what to expect

Most visitors diving in Japan will do so through a dive centre catering mostly, if not exclusively, to non Japanese-speaking divers, which can simplify things, and ease the culture shock.

And yet, in most cases, unless they are locally based (such as an non-Japanese run dive centre in Okinawa), most dive-centres specialised in non Japanese-speaking divers will be acting as booking agents, organising your dive-trip and providing their own English-speaking dive staff to accompany you, which means you will still be diving in a Japanese operation.

Furthermore, thanks to the amazing efforts the NPO Dive in Japan, it is now perfectly possible to book some diving directly with standard local dive shops choose to take part in their program.

Diving in with a Japanese dive centre can be, in some ways, great fun, and also something of a unique cultural experience. And the level of service offered is usually excellent.

Yonaguni – Okinawa Pref. – Image source: divenavi.com

We’ll go over some specificities you might encounter when diving in a Japanese context, along with some general advice to help you make the most of the experience.
We’ve also drawn up a basic diving vocabulary, which you’ll probably never need, but could come in handy in some cases.

First of all, as a rule, we strongly advise you to always book activities in advance in Japan, and to avoid the rush of major Japanese holidays.

Japanese facilities are certainly used to dealing with visitors having only limited time to spare, since this is the case with the majority of Japanese tourists (who generally work long hours and have much shorter holidays than elsewhere).
Which means operations are usually well organised, and efficient  – a good example of this would be the tourist information desks found in major Japanese railway stations, very useful in helping you organise a local visit efficiently, in whatever time you might have.

However, also because of time constraints, improvisation isn’t always easy. You’ll find that adaptation capacities are limited and last-minute changes are generally not appreciated.

Izu boat dive  – Shizuoka Pref. – Image source: tdivefct.co.jp

Likewise, we recommend that you make sure to always be on time in Japan. 
With many Japanese being on a tight schedule, customers showing up 30 minutes late is not only rude/inconsiderate from a cultural point of view, but can also seriously compromise the timed plans of other visitors/divers.
One way to approach this is to consider that in Japan, being on time for diving means being there – and ready – 5 minutes in advance!

As an example, we’ve personally guided Japanese divers who had crossed the Pacific Ocean and faced a 16-hour time difference to dive for three days in the Sea of Cortez, before returning to Tōkyō – needless to say, they wanted to make the most of it…

In general, we strongly recommend that you confirm schedules with the dive centre that will welcome you, and to really make sure to be on time.
Better still, if you can, plan to arrive about ten minutes early, which is actually quite normal in Japan.

After diving, most dive centres in Japan will offer some kind of time dedicated to working on logbooks or photo IDs (called loguzuke ログづけ in Japanese), which is an important cultural aspects in Japanese diving culture, and one where you can get a taste of Japanese dive guide’s extensive knowledge on local marine life.

This might be limited to handing out a sheet with the names of marine life encountered, for practical reasons (Japanese dive centres do not employ as much staff as South-East Asian operations, meaning dive-staff is also often quite busy with multiple operational tasks before and after the dives), or simply for language issues, since fish names in Japanese and English are quite different, which might make communication difficult.

At the end of a diving session, especially multiple-day ones, Japanese dive centres might offer customers the chance to socialise later in the day or in the evening, over drinks and/dinner.
While quite common, this custom, called uchi-age (打ち上げ)in Japanese (a sort of “closing celebration”), is not practiced by all dive centres, and also might not be offered to non Japanese-speaking guests, for language/cultural reasons.

If you are invited to a post-dive uchi-age type of event, they will often be short, as dive staff do have to get up quite early, so again be on time, even if it is an informal invitation.
Lastly while there is no tipping in Japan, offering to offer to buy your dive guide a drink is fine, though it might be declined for various reasons.

Click here for more info on social aspects of Japan’s diving culture.

Ogasawara taiko drumming  for the ferry departure – Tōkyō Pref. – Image source: ogasawara-youthhostel.com

At the dive centre

If no one is there to greet you (if there are many other customers, for example), and you’re not sure who to talk to (you can’t rely on the t-shirts people might be wearing, as many customers like to wear the “colours ”of the operator they often dive with…), simply ask someone.
Speak slowly and it should be fine, eventually refer to our vocabulary section if you are not making yourself understood.

Japanese people are generally friendly and will point you in the right direction, and this could be a way to meet future dive buddies.
Once you’ve found a staff member, state your name and mention your reservation – they will most likely know that already.

Staff will normally show you around the facility, including equipment area and toilets/showers, and also give you the necessary paperwork to fill-out (including a liability release and medical questionnaire), check your certification card/logbook if applicable, and eventually take care of the payment, if this has not been done already.

Make a mental note of areas where you need to take off your shoes, if any.

There might be a sign ( with a no shoes icon, or a phrase like 土足厳禁), or some physical delimitation (such as step, line, carpet), or sometimes a system of slippers intended to be worn inside.

Image source: yukibnb.com

Also do confirm areas that need to be kept dry, if coming back to the dive centre directly after a dive with your dive gear, and also check gear rinsing/drying options, if applicable.
The general idea is usually to rinse fragile electronics (such as cameras, dive computers, lights, etc…) separately from the rest of the dive gear, usually in a dedicated fresh water rinse tank.

Washing area – Image source: seafriend.jp

Schedule and logistics

Once the paperwork is done and you’re seen the facilities, check and confirm the schedule and logistics with the staff.

Confirm where you need to be, and at what time, and also in what state of readiness, which varies depending on the type of diving planned and local logistics (boat, shore-dive with transport to the dive site, meeting up at the dive site or even walking to the dive site if it’s really close…).

It’s always good to check if you should be wearing your wetsuit already, wearing your wetsuit halfway up or even changing on the spot if they have showers or changing rooms, for instance.

Also confirm what will be doing with your gear (will you be leaving it at the dive centre, or bringing it yourself, and also when and where you should be setting up for the dive).
Some dive centres might lend you a bag or a crate to store your gear in for instance, especially on boat dives.

When it comes to setting up equipment, Japanese divers are usually quite self-sufficient, and will generally setup their own gear – especially if it is their own personal equipment.
Some operations might offer to do a basic set up of your equipment, as a service or for practical reasons, especially for boat dives, but this is not the norm, unlike in South-East Asia and other places where it is common for dive staff and/or boat crew to setup customers’ gear for them.

If you would rather set up yourself (and we definitely think you should…), or not have anyone touch your own equipment, make sure to mention this at the dive centre, just in case.

Also check what happens after the dive, especially what will happen to your gear, if you will be able to wash / dry it and where.

Finally, if it’s not clear, make sure to check how things are organised for lunch and drinks, especially on 2 tank or 3 tank boat day trips, for instance.

The dive centre will normally give you all this information, but some things might get lost in translation if diving with a Japanese dive centre not used to non-Japanese-speaking guests, for instance.
When in doubt, ask for clarification, better safe than sorry!

The most important thing is to check and confirm schedules, and again, to always be on time or better, slightly early.

Setup – Image source: yokohama-dive-seven7.com

Dive briefing And groups

Whatever the context, diving activities should always be preceded by some sort of dive briefing, covering safety and practical aspects.

The briefing can be given by each guide to his group, or take the form of a general briefing given to all the divers present.
It can take place on dry land, at the dive centre or meeting point, or on the boat before the dive.

The briefing should, at the very least, provide clear dive planning information, including but not limited to:
maximum depth, maximum dive time, entry-exit procedures, emergency procedures including what to do if one if separated from the group/lost, possible dangers that you should be aware of, dive site specificities and basic orientation, as well as other appropriate information for the type of diving planned.

If in doubt, remember to confirm who your guide is, who the other members of your dive group are (especially if the briefing is a general briefing given to all divers present) and, very importantly, who your assigned dive buddy will be.

Briefing – Image source: youtube.com

On a more cultural note, in the case of a guided dive, which is by far the most common form of diving in Japan, you may sometimes find yourself in a situation where the makeups of buddy pairs/groups, and/or positions within the dive group are not clearly specified.

More than carelessness, it seems certain socio-cultural factors at play make this a more common occurence in Japan than elsewhere.
Some guides seem to feel that that allocating buddy pairs is somewhat intrusive, something of an imposition or even disrespectful towards the divers they are responsible for, especially if they are guiding experienced, senior divers or some sort of VIPs, and can get in the habit of skipping this element of dive organisation in briefings.
And Japanese divers themselves will rarely ask the question, considering that the guide is responsible for the group organisation and therefore be responsible for all assistance or rescue procedures…

Furthermore, converging, yet sometimes contradictory notions of “self-responsibility” (jiko sekinin) and also the widespread idea at you can somehow leave it all to the guide are also at play (Japanese guides sometimes complain that the distinction between a dive guide and an instructor can be particularly blurry in Japanese contexts).
This, combined with socio-cultural pressures deriving from required customer service and the more vertical nature of social relationships mean that this type of vagueness can be somewhat common in Japan  – even though, as everywhere else, standards of all training organisations (RSTC, CMAS or others) insist on the need to form buddy pairs/or groups in standard recreational diving settings.

Keep in mind that idea of giving open, direct feedback, especially to “superiors”, and of integrating aspects such as human factors to reinforce overall safety is still relatively new in the diving industry, slowly permeating from technical diving oriented communities, and still has a particularly long way to go in contexts where vertical human relationships prevail.

If in doubt, do not hesitate to ask with your guide, and to confirm team composition, organisation and who your buddy (badī in Japanese) will be!

Just make sure everything is clear before the dive, and ask for confirmation if something isn’t (again, people learn English at school, so speak slowly and it should be fine, and eventually refer to our vocabulary if you are not making yourself understood).

Guided Diving In Japan

Buddies teams and dive groups

Most diving in Japan will be led by a dive guide (“divemaster”) 
Your guide will generally ask you to dive as a team, staying together throughout the whole dive, and moving through the water as a single group.
This generally means diving behind the guide, while also remaining close to your buddy, so that you can easily make physical contact with them if necessary.

If you are alone, the guide will normally assign you a buddy at some point before the dive, usually another diver in the group, unless the group has an odd number of divers, in which case some divers might function as a “buddy group” rather than pair.

Dive groups usually consist of four, five to six divers per guide – keep in mind that any group of more than 6 divers to a guide is quite difficult to supervise efficiently, so do make things easy on your dive guide by staying close and visible, and also keep an eye on your buddy.

In most situations, buddy pairs are expected to follow the guide in single file, often with the more experienced buddy pairs placed at the back of the group, closing the line.

Do not hesitate to ask to stay near the dive guide if you don’t feel very confident for a reason or another. Japanese dive guides are generally very attentive and helpful, and are really there to help you get the most out of the dive.

In Japan, the dive guide’s role is not limited to just orienting buddy pairs around the dive site.
You will also rarely encounter the form of “indirect supervision” by a divemaster sometimes offered in North-American contexts, nor the dive supervisor role you might find in European context, such as the captain of a boat briefing autonomous pairs of CMAS divers for instance.

The dive-guide’s role here is somewhat more active and involved.
While non-Japanese divers are generally considered more autonomous and self-reliant than their Japanese counterparts, the dive-guide might be more present than what you are used to (more on this here)

Which is why you should not hesitate to inform your guide in advance of any problems you think you might have, including eventual fears and anxieties, needs or preferences, which will allow him to anticipate issues, and also to take this information into account when organizing the dive group.

If you are a photographer, think about mentioning this in advance, especially if you require extra time for your photos.
Underwater photography is very common in a photographer’s heaven like Japan, but do keep in mind that is not always easy or possible to accommodate the personal needs of several photographers in a single dive group.

Remember to follow the guide, and stay close to your buddy, especially if the visibility is poor. It is very easy to get lost in murky waters, and some guides will set up a procedure to avoid this (spatial organisation of the dive group, use of a dive light as a signalling device, etc…) and emergency procedures in case of separation,  which everyone in the group should be aware of and fully understand.

Guided diving – Image source: atsugi-papalagi.jp

Air consumption

Another important aspect is air consumption management.

Once they have some diving experience, Japanese divers tend to have good air consumption, especially people of a smaller build.
Which means that in a mixed group, there’s always the chance you might end up having the highest air consumption.
Japanese dive guides are usually well aware of this possible difference linked to physical build, and will try to anticipate this, but if you are a particularly heavy breather, remember to mention this to your guide, so that he or she can find a way to balance out the group’s gas consumption, in order to avoid cutting other divers’ dive time short.

There is no hard and fast rule, but usually dives usually come to an end when one of the divers in the group first reaches 50 bar (roughly 700 PSI “red zone” on your depth gauge), which is the most commonly accepted reserve pressure, at which the dive guide will lead the group to a safety stop (generally 3 minutes at 5-metre depth), before surfacing as a group.

This basic information should be given in the briefing of course – make sure that you understand it perfectly and that is clear for everyone, and ask for clarifications otherwise.

When diving with a guide, remember to check if, when and how the guide wants you to tell her/him your remaining gas pressure. It is especially important to check how you’re expected to do so.

Some guides who have worked abroad might use a specific sign meaning “tell me what your pressure is” a very common sign being to tap the open palm of the right hand with the fingers, with the left hand roughly three times.
But this sign is not common in Europe and Japan, and other guides will just show you their pressure gauge – remember to confirm this with your guide.

If you see the guide checking other divers’ gas pressure, anticipate and check yours so you can let them know directly when it’s your turn.

Importantly, Japanese divers dive in bar, not PSI.

If you’re using your own PSI pressure gauge, mention this to your guide before the dive, and do check what the reserve pressure will be (we generally use the following equivalents 3000 PSI = 200 bar, 1500 PSI = 100 bar, 700 PSI = 50 bar / reserve pressure, at which to initiate the dive-ending safety stop, but there might be variations).

Keep in mind that some guides are unfamiliar with the hand signals used for signalling PSI pressures (taping fingers on the forearm for the thousands, etc…), so really do check with your guide, and, if in doubt, simply show your gauge to the guide.

Commonly used hand signal for "Remaining pressure"

Image source: pinterest.com

Hand signals

Diving hand signals are standardised and generally the same worldwide, but do however present slight differences between diving cultures (RSTC/CMAS) and regions, which it is best to be aware of.

Pay particular attention to ways of signalling remaining gas pressure, the half-pressure / half-tank hand signal, the 50 bar / reserve-pressure hand signal, and the safety stop hand signal.

Remaining gas pressure: Japanese divers tend to either signal their remaining gas pressure in bar, or simply to show their pressure gauge to the guide.

For pressure signalis, however, the commonly used code where 1 finger = 10 bar is rarely used.
Instead, Japanese divers typically signal their gas pressure by breaking down the numbers, from hundreds to units.

Thus, a pressure of 130 bars is most often reported 1 – 3 – 0, with one finger (index) for the number one, then three fingers (middle ring index) for the number three, then the five fingers grouped together on the thumb. (sign of the “well” in the paper-rock-scissors) for the 0.

150 bar, Japanese style

Image source: ameblo.jp

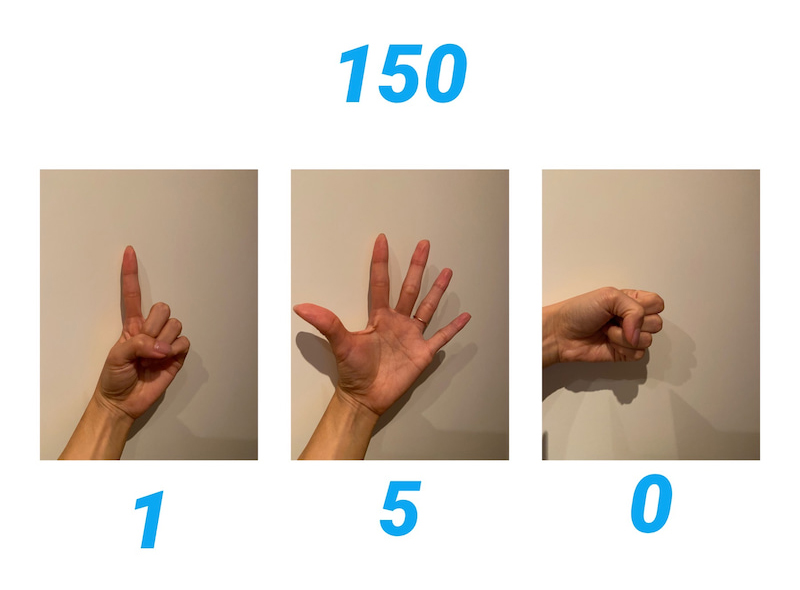
The “half-pressure” hand signal (which is also often to indicate 100 bar), tip of one hand to the palm of the other forming a T, like in the time-out sign, is very rarely used by Japanese divers, who most often report a pressure of 100 bar by signalling a 1, followed by a 0, and then another 0…

A remaining pressure of 70 bar will either be signalled with two hands (5 + 2 then 0) or with one hand (5 then 2 then 0).

The “reserve-pressure” hand signal (which is also often to indicate 50 bar),  at which one should initiate a safety stop and end the dive, ie a closed-fist, is also not that commonly used in Japan.
Instead, Japanese divers often report 50 bar by a 5 then a 0 rather than by the specific specific signal.

And if a “reserve pressure” hand signal is indeed used, the most common signal will be the one taught in RSTC training, a closed fist but kept close to the body, and generally not closed-fist-to-the-temple used in some CMAS federations.

CMAS reserve pressure signal

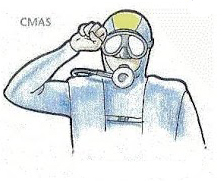
Keep in mind that, in Japan as elsewhere, especially in places with a strong RSTC dive culture, the fist to the temple reserve-pressure sign is not always understood because it is not generally taught as such in RSTC trainings (and can be interpreted as a fish ID sign, something like “half hammerhead shark” for example…).

Be sure to check important hand signals, including “reserve gas pressure reached” with your dive guide, before the dive.

If in doubt, just show your pressure gauge to the guide to avoid confusion!

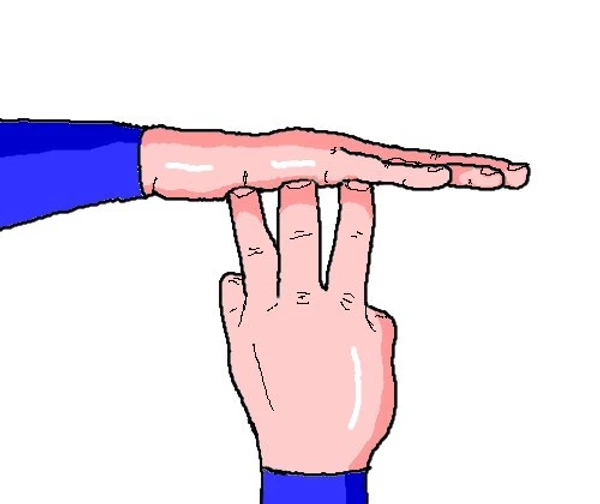
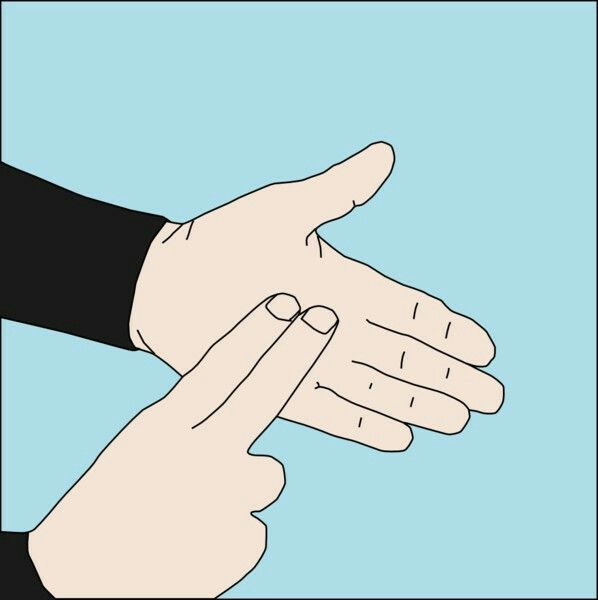
Finally, the hand signal for “safety stop” is often indicated using the signal normally meaning “come up to my level” elsewhere, namely the thumb of a hand touching the flat palm flat of the other hand, instead of the more standard sign where the index, middle and ring fingers (symbolising a 3 minutes stop time) touch the open palm of the other hand (5 extended fingers, symbolising a stop depth of roughly 5 meters).

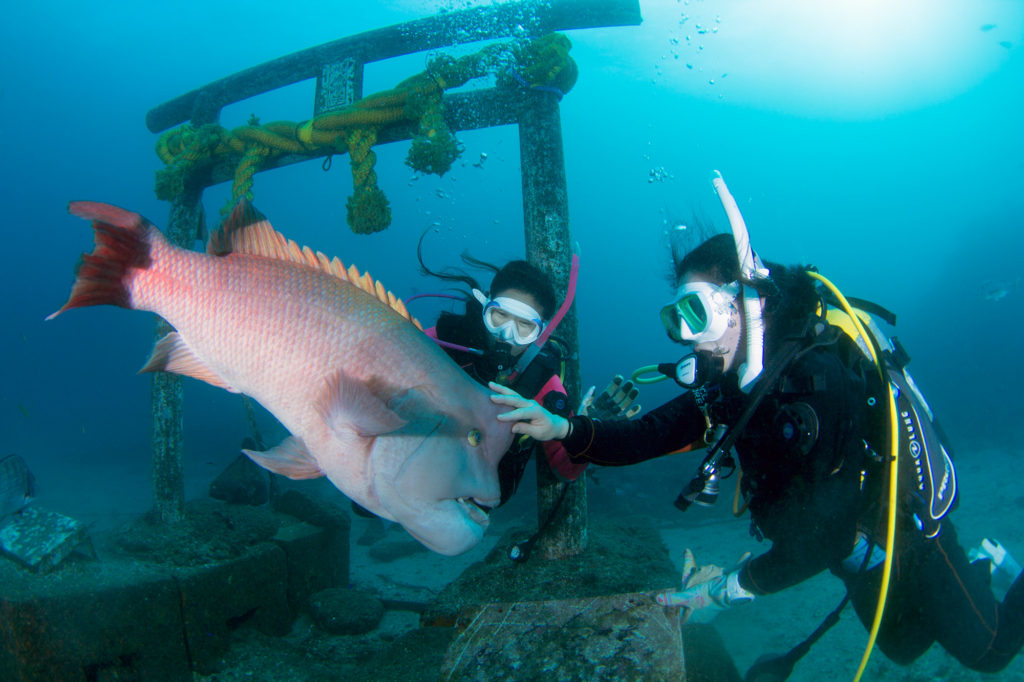
Do note that Japanese divers are sometimes reluctant to communicate using hand signals underwater, especially for fish ID signs, which are just not part of Japanese diving culture.

In a fully Japanese context, the underwater magnetic slate rules, ranging from smaller individual models to the larger slates of dive-guides (such as the “Sensei” models by the toy-brand Toby), who are expected to communicate actively, and politely, with the divers they guide during the dive.

More on this rather exotic aspect of Japanese dive culture here.

Commonly used Safety stop hand signal

Emergency procedures

You should also be informed of the emergency procedures you and the group are required to follow, especially in the event you are separated from the rest of the group.

A standard procedure when one is lost/separated is what we call the “one-minute rule

  • If you find that you are lost, you should stay where you are, looking around for the group, up and down for a minute, which you should measure with your dive computer or by counting to 120 in your head (with stress, a head count to at 60 can take much less than a minute…), waiting for the guide to come back and find you.

Remember to stay where you are – if you keep moving, the guide will not be able to make his way back to where he/she last saw you to find you, so remember to just stay stationary and look around for a minute.

  • If no one from your group shows up after a minute, begin a slow ascend to the surface.

Send a Surface Marker Buoys (DSMB/ “safety sausage”) if possible, and ascend directly but slowly (15-10 metres per minute) to the surface, without making a safety stop as this is an “emergency” situation and safety stops are optional.
Do slow down and be particularly careful in the 5m depth zone, maintaining proper buoyancy control, looking up and around at 360° and listening for any engine noise before surfacing.
At 10 metres per minute, it should take you 30 seconds to go from 5 m to the surface.

Once on the surface, inflate your BCD, make yourself visible and wait for your group to surface.

  • Once he/she realises a diver or buddy team is missing, the guide, who should know the dive site very well, will start taking the group back to where he last saw you, and try to find you for roughly a minute.
    If the guide cannot locate you after a minute’s searching, he/she will start heading slowly to the surface with the entire group, again with no safety stop, so you can reunite on the surface, and resume the dive together if that is still possible – if not, this will be the end of the dive.
  • One major exception to this one-minute rule are drift dives.
    During a drift dive, or if the current is too strong for you to stay you are, there is no point in trying to wait a minute before starting your ascent, as the guide leading the guide will not be able to return to where he/she last saw you.
    Simply start a slow ascent straight away, without making a safety stop, and send a surface marker buoy if possible.
    It will generally be mean the end of the dive for the lost diver or buddy team, so make yourself visible.

There can be local variations to this procedure, so make sure you understand what is expected of you, and why.
The best is to do your best to avoid getting lost, of course, but things happen, for multiple reasons, so don’t presume everyone has the same training, and be clear on what you should do.

Other aspects

Depending on the operation and the type of diving planned, you might also encounter some slightly surprising diving procedures.

It is legal in Japan for operators to have divers dive from an unattended boat, so don’t be surprised if the skipper turns out to be your dive-guide and the boat is left empty on anchor as you descend.
This is normally done in protected dive sites, with safety procedures in place, but it’s hard to not ask oneself a series of what if questions (Bonnie Waycott recalls such a unmanned boat diving experience that didn’t go quite as planned here)…

Some areas can be quite strict when it comes to maximum dive time, which can be quite short in certain cases, especially on currenty dives/deeper such as Japan’s hammerhead dives, and have less common requirements, entry procedures (but there’s usually reason in the madness).

Labour is expensive in Japan, and dive groups can also be quite large in certain places, and divers levels in the groups can vary a lot, especially in areas offering more “industrial” approaches to diving activities.

Service

What is considered good, efficient customer service can also go beyond what you would encounter elsewhere.

You’ll commonly see Japanese guides not just using the big slate (more on this here), but caring for very dependent guest that seem to need having everything done for them, down to air management…
Guides also occasionally over-the-top service such as taking off guest’s fins for them in the water.
While this is perfectly understandable when a diver has some form of impairment and requests such a service, guides doing this automatically with all certified divers in one’s care, as well intentioned as it might be, is a little odd and does tend to induce unnecessary dependency…

This is luckily changing, but you might sometimes still come across practices that might raise an eyebrow or two, such as reef fish feeding (which was once very common for try dives and snorkelers), solo diving with no equipment redundancy or training, or divers trying to make the most of it by doing 5+ dives a day…

Other apects you might unfortunately encounter include dragging, unsecured dive gear (there seems to be something off about alternate second stage and gauge securing in Japan) and, when it’s not the invariably gloved guests themselves,very tactile guides (touching/ handling marine life, not their guests…).
And of course, as elsewhere, some very goal-focused photographers, showing little environmental awareness.

You do not need to speak Japanese to dive in Japan.
We have, however, compiled a small selection of useful diving-related vocabulary and phrases, which might interest the language-curious and even help resolve specific issues.

1877 Japanese > English vocabulary – Image source: reddit.com

Scroll to Top